Ricoh SP150 Hack
Most printers do not have a mechanism to measure the amount of ink left inside their cartridges. Therefore, instead of measuring ink, they use a print counter on the cartridge chip. When the counter reaches to zero, the cartridge becomes unusable, even if there is ink still left. That’s why filling the cartridge doesn’t work. The only “legal” solution is to throw away the old cartridge and get a new one. While searching for cartridges on the internet for my old Ricoh SP150 model printer, I came across a very useful blog. The blog explains how an old chip of the cartridge can be reset just with an Arduino and some wires.
Please visit the original blog post about this hack. I found it very informative and interesting. I wanted to post it here as a reference for future readers, including myself. And also as a way to preserve the information in that post.
Summary
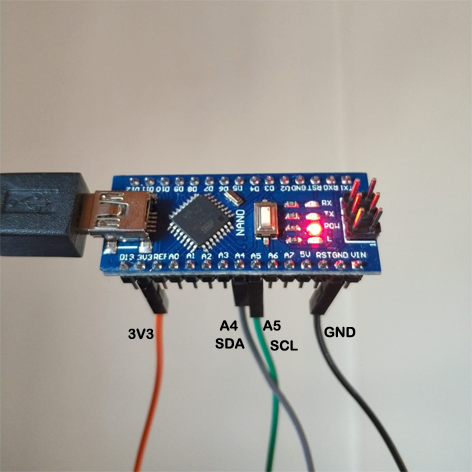
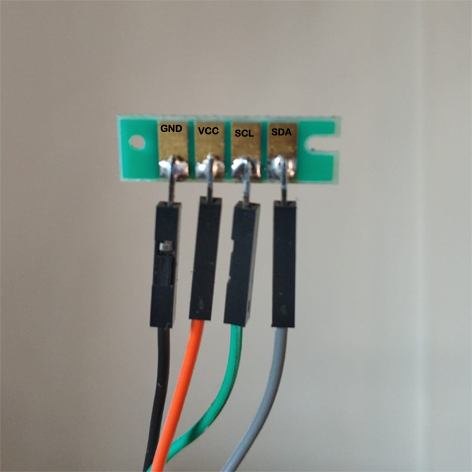
Chip uses I2C protocol to communicate with the printer. The counter value could be set using the I2C protocol as well. Connect wires to the Arduino and the chip as shown in images, and use the code below to reset the chip. Adjust the pins as necessary.
// Update EEPROM_I2C_ADDRESS define value with the chip you want to reprogram
// 83 is Chip K - black
#define EEPROM_I2C_ADDRESS 83
#include <Wire.h>

byte KChipData[]={ 50,0,1,3,18,1,1,255,100,0,52,48,55,53,52,51,20,9,65,66,22,0,22,38,255,255,255,255,255,255,255,255,255,255,255,255,255,255,255,255,255,255,255,255,100,0,0,0,255,255,255,255,255,255,255,255,255,255,255,255,255,255,255,255,255,255,255,255,255,255,255,255,255,255,255,255,255,255,255,255,255,255,255,255,255,255,255,255,255,255,255,255,255,255,255,255,255,255,255,255,255,255,255,255,255,255,255,255,255,255,255,255,255,255,255,255,255,255,255,255,0,0,0,0,0,0,0,0};
void setup() {

// find EEPROM_I2C_ADDRESS
// WhatI2CAddress();
// return;

 byte WriteData[128];
 memcpy(WriteData,KChipData,128*sizeof(byte));

 // Start Wire and Serial bus
 Wire.begin();
 Serial.begin(9600);
 delay(1000);

Serial.println("Start");
Serial.println(" ");
delay(3000);
Serial.println("go");

if (0){ // set to 1 to write to chip
 Serial.println("Write 128 bytes:");
 byte wordaddress;

 for(byte i=0;i<128;i++){
   wordaddress = i;
   i2cwrite((byte)wordaddress,(byte)WriteData[i]);
   //Serial.print(wordaddress);
   //Serial.print(":");
   Serial.print(WriteData[i]);
   Serial.print(",");
 }
}

// Start Read chip
 Serial.println(" ");
 Serial.println("Read 128 bytes:");
 for(byte i=0;i<128;i++){
   byte readVale = i2cread(i);
   //Serial.print(i);
   //Serial.print(":");
   Serial.print(readVale);
   Serial.print(",");
 }
 Serial.println(" ");
 Serial.println("End");

}

void loop() {

}

void i2cwrite(byte address, byte data) {
 Wire.beginTransmission(EEPROM_I2C_ADDRESS);
 Wire.write((byte)address);
 Wire.write((byte)data);
 Wire.endTransmission();
 delay(20);
}

byte i2cread(byte address) {
  byte rData = 0;
  Wire.beginTransmission(EEPROM_I2C_ADDRESS);
  Wire.write((byte)address);
  Wire.endTransmission();

  Wire.requestFrom(EEPROM_I2C_ADDRESS,1);
  while (Wire.available()){
    rData = Wire.read();
    return rData;
  }
}

void WhatI2CAddress() {
  Serial.println("started");
  for(int i=0;i<128;i++){
    Wire.requestFrom(i,1); //request first data byte
    Serial.print(i);
    Serial.print(":");
    while(Wire.available()){
      byte c = Wire.read();
      Serial.print(c); //if data exist, print it out. That way you can identify which address.
    }
    Serial.println(" ");
    delay(5);
  }
}